When early summer rolls around and garlic scapes begin to curl in the garden or at the farmer’s market, it’s a brief but glorious time to make the most of these green, garlicky spirals. Pickled garlic scapes are a seasonal delicacy that deserve a place in your kitchen—not just as a snack, but as a vibrant addition to charcuterie boards, Bloody Marys, sandwiches, and salads.
Pickling garlic scapes is a tradition in many home kitchens, especially in regions where garlic is grown in abundance. My own love for pickled scapes started in my grandmother’s farmhouse kitchen, where no part of the plant went to waste. The jars lined her pantry shelves like treasure chests, ready to open whenever a zesty garnish or crunchy bite was needed. This recipe pays homage to that simple, waste-free tradition, and the results are every bit as satisfying.
What Are Garlic Scapes?
Garlic scapes are the flower stalks that hardneck garlic plants send up in late spring or early summer. They’re typically snipped off to encourage the plant to focus its energy on growing a larger bulb underground. What’s left is a tender green stalk that curls into whimsical loops and tastes like a mild, slightly sweet version of garlic.
Scapes are highly seasonal and only available for a few weeks each year. They’re crunchy, pungent, and packed with flavor—making them ideal candidates for pickling.
Why You’ll Love Pickled Garlic Scapes
Pickled garlic scapes bring together all the elements of a great pickle: crunch, acidity, and aromatic complexity. Here’s what makes them stand out:
-
Incredible crunch: Garlic scapes hold their firm texture even after pickling, delivering a satisfying snap with every bite.
-
Unique garlic flavor: Milder and sweeter than cloves, scapes provide just enough garlic flavor without overwhelming your palate.
-
Versatility: Use them as a snack, cocktail garnish, sandwich topping, or salad addition.
-
Preservation: Extend the fleeting scape season by months with this simple pickling process.
Ingredients You’ll Need
To make classic pickled garlic scapes, gather the following:
-
1 pound garlic scapes, trimmed and cut to fit your jars
-
2 cups white vinegar (5% acidity)
-
2 cups water
-
2 tablespoons kosher salt
-
2 teaspoons sugar (optional, to balance acidity)
-
1 teaspoon black peppercorns
-
1 teaspoon mustard seeds
-
1/2 teaspoon crushed red pepper flakes (optional for heat)
-
4 sprigs fresh dill or 1 teaspoon dill seed
-
4 garlic cloves (optional for extra garlicky flavor)
-
Sterilized jars (two pint-sized jars or one quart-sized jar)
This basic brine recipe makes a tart, garlicky, and slightly spicy pickle, but it’s highly adaptable. Feel free to experiment with spices like coriander seeds, bay leaves, or allspice to create your own custom flavor.
How to Make Pickled Garlic Scapes
Step 1: Prepare the Scapes
Trim off the woody ends of the garlic scapes and remove the flower bud at the tip. Cut the scapes into pieces about 4 to 5 inches long—enough to fit snugly in your jars. If you’re using a wide-mouthed jar, you can even coil the scapes into spirals, which looks beautiful and saves space.
Step 2: Sterilize Your Jars
Before you start pickling, sterilize your jars and lids in boiling water for 10 minutes. Let them air dry on a clean towel while you prepare the brine.
Step 3: Make the Brine
In a medium saucepan, combine the vinegar, water, salt, and sugar. Bring to a boil, stirring until the salt and sugar dissolve. Remove from heat.
Step 4: Pack the Jars
Place garlic cloves, dill, peppercorns, mustard seeds, and red pepper flakes (if using) at the bottom of each jar. Pack the garlic scapes in vertically or coil them to fit. Pour the hot brine over the scapes, leaving about 1/2 inch of headspace. Tap the jars gently to release air bubbles.
Step 5: Seal and Cool
Wipe the rims clean and seal the jars with sterilized lids. Let the jars cool to room temperature before refrigerating. If you prefer to water bath can them for shelf-stability, process in boiling water for 10 minutes (adjust for altitude as needed).
Storage and Shelf Life
-
Refrigerator pickles: Store in the fridge for up to 3 months. Wait at least 3-5 days before eating to allow flavors to develop.
-
Canned pickles: If processed using a water bath, the sealed jars can last up to a year in a cool, dark pantry.
Once opened, refrigerate and use within 2 months for best quality.
Serving Suggestions
Pickled garlic scapes are as versatile as they are flavorful. Here are some favorite ways to enjoy them:
-
On charcuterie boards: Add them alongside cheeses, cured meats, and olives for a punch of acidity.
-
In Bloody Marys: Use them as a spicy, garlicky stir stick or garnish.
-
Chopped into salads: Add bite-sized pieces to potato salad, egg salad, or green salads.
-
Topping sandwiches or burgers: Their crunch and tang are the perfect complement to rich meats and cheeses.
-
With grilled meats: Serve them on the side for a bright, acidic counterpoint to barbecue flavors.
Tips for Perfect Pickled Garlic Scapes
-
Use young, tender scapes: Older scapes can be fibrous. Choose ones that are bright green, smooth, and flexible.
-
Don’t skip the sugar: Even a small amount helps mellow the vinegar’s sharpness.
-
Let them sit: The flavor improves dramatically after a few days in the fridge.
-
Customize the brine: Add different spices like coriander seed, bay leaf, or smoked paprika for variety.
-
Label your jars: Don’t forget to mark the date and any special spices you used.
Health Benefits of Garlic Scapes
Beyond their bold flavor, garlic scapes also offer some nutritional perks:
-
Rich in antioxidants: Like garlic bulbs, scapes contain allicin, which supports heart health and has antimicrobial properties.
-
Low in calories: They’re a light, nutrient-rich snack or addition to meals.
-
Anti-inflammatory effects: Some studies suggest garlic and its derivatives may help reduce inflammation in the body.
While pickling does reduce some of the raw nutrients, the flavor and preservation benefits more than make up for it.
FAQs About Pickled Garlic Scapes
Can I use apple cider vinegar instead of white vinegar?
Yes, apple cider vinegar adds a fruity complexity to the pickles. Just ensure it has 5% acidity for safe preservation.
Are pickled garlic scapes spicy?
They can be if you add red pepper flakes. Without them, the flavor is more garlicky and tangy than hot.
Do I have to can them, or is refrigeration enough?
Refrigeration is fine for short-term storage (up to 3 months). If you want to store them at room temperature, follow proper canning procedures.
Can I pickle frozen garlic scapes?
Fresh scapes yield the best texture. If you freeze them first, they may become mushy when pickled.
Sustainability and Zero Waste
Using garlic scapes is a great way to embrace nose-to-tail (or bulb-to-stem) cooking in your garden or kitchen. By harvesting and preserving the scapes, you:
-
Prevent waste from garlic plants
-
Make use of an ingredient that’s often discarded
-
Reduce your reliance on store-bought pickles in plastic packaging
It’s a small, delicious step toward more sustainable food habits.
Print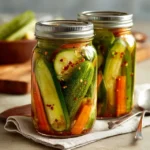
Pickled Garlic Scapes: A Crunchy, Tangy Treat You’ll Crave Year-Round
- Total Time: 30 minutes
- Yield: 2 pint jars 1x
Description
A seasonal favorite that captures the brief garlic scape harvest in a jar. These crunchy, tangy pickles are perfect for snacking, garnishing cocktails, or brightening up sandwiches and salads. Their mellow garlic flavor and satisfying texture make them a must-try for any pickling enthusiast.
Ingredients
-
1 lb garlic scapes, trimmed and cut to fit jars
-
2 cups white vinegar (5% acidity)
-
2 cups water
-
2 tbsp kosher salt
-
2 tsp sugar (optional)
-
1 tsp black peppercorns
-
1 tsp mustard seeds
-
1/2 tsp crushed red pepper flakes (optional)
-
4 garlic cloves (optional)
-
4 sprigs fresh dill or 1 tsp dill seed
-
2 pint jars or 1 quart jar, sterilized
Instructions
-
Trim the garlic scapes by removing the flower bud and cutting them into 4–5 inch pieces to fit your jars.
-
Sterilize your jars and lids by boiling them in water for 10 minutes. Set aside to air dry.
-
Place garlic cloves, dill, peppercorns, mustard seeds, and red pepper flakes (if using) at the bottom of each jar.
-
Pack the trimmed garlic scapes into the jars, standing them vertically or coiling them to fit snugly.
-
In a saucepan, combine vinegar, water, salt, and sugar. Bring to a boil, stirring until salt and sugar are fully dissolved.
-
Carefully pour the hot brine over the packed scapes, leaving about 1/2 inch of headspace at the top.
-
Tap jars gently on the counter to release air bubbles. Wipe the rims clean and seal with sterilized lids.
-
Let cool to room temperature. Store in the refrigerator for up to 3 months or process in a boiling water bath for 10 minutes for shelf-stable storage.
-
Allow at least 3–5 days before eating to let flavors develop.
Notes
-
Apple cider vinegar can be used in place of white vinegar for a fruitier flavor.
-
For a sweeter pickle, increase sugar to 1 tbsp.
-
Customize the spice blend with coriander seeds, bay leaves, or chili flakes.
-
Refrigerated pickles will stay crisp and flavorful for up to 3 months.
- Prep Time: 20 minutes
- Cook Time: 10 minutes