The Ultimate Halloween Cookie for a Spooky Sweet Treat
There’s something magical about Halloween—the cool breeze, the crunch of fallen leaves, and the smell of sugar and spice in the air. It’s a time of costumes, laughter, haunted houses, and of course, indulgent treats. Whether you’re hosting a monster mash, planning a Halloween movie night, or looking for the perfect dessert to surprise trick-or-treaters, these Halloween Oreo Stuffed Chocolate Chip Cookies are guaranteed to steal the show.
Inspired by a childhood love for Halloween candy and the irresistible combination of Oreos and chocolate chip cookies, this recipe fuses two iconic favorites into one indulgent, spooky-themed dessert. The vibrant orange Halloween Oreos are not only festive, but they add a delightful crunch and a creamy filling that takes traditional cookies to a whole new level. Let’s get baking—and prepare to impress every ghoul and goblin around!
Why You’ll Love This Recipe
-
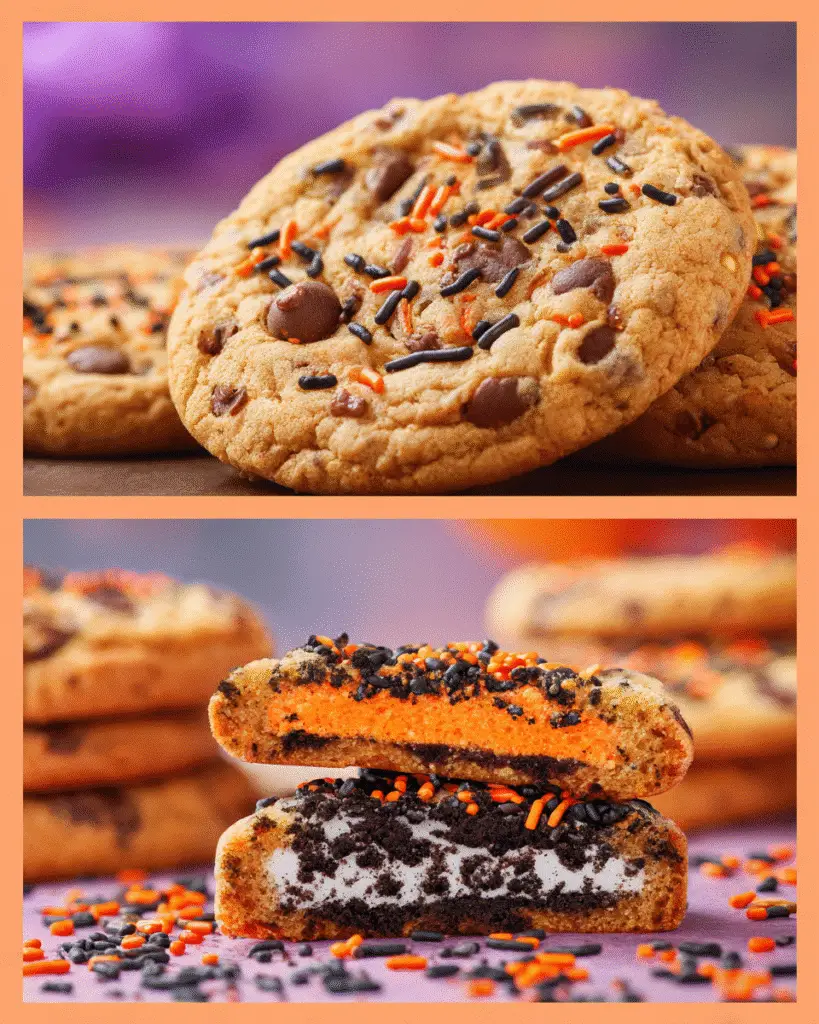
Visually festive: The orange cream center of Halloween Oreos peeks through the cookie dough, giving it a vibrant and spooky flair.
-
Perfect texture: These cookies are golden and crispy on the edges with a soft, gooey center, thanks to the Oreo surprise.
-
Show-stopping treat: They’re thick, bakery-style cookies that look as impressive as they taste.
-
Crowd-pleasing: Ideal for Halloween parties, school bake sales, or as a special dessert to hand out on Halloween night.

Ingredients You’ll Need
Here’s a quick rundown of what you’ll need to bring these decadent cookies to life:
For the Cookie Dough
-
1 cup (2 sticks) unsalted butter, softened
-
1 cup packed brown sugar
-
½ cup granulated sugar
-
2 large eggs
-
1 tablespoon pure vanilla extract
-
3 cups all-purpose flour
-
1 teaspoon baking soda
-
½ teaspoon baking powder
-
½ teaspoon salt
-
2 cups semi-sweet chocolate chips
For the Filling
-
18 Halloween Oreos (orange crème center)
Kitchen Equipment
To ensure a smooth baking experience, make sure you have:
-
Stand mixer or hand mixer
-
Mixing bowls
-
Rubber spatula
-
Measuring cups and spoons
-
Cookie scoop (optional, but helpful)
-
Baking sheets
-
Parchment paper or silicone baking mats
-
Cooling rack
Step-by-Step Instructions
Step 1: Preheat and Prep
Preheat your oven to 350°F (175°C). Line two large baking sheets with parchment paper or silicone baking mats. Set aside.
Step 2: Make the Cookie Dough
In a large mixing bowl, cream together the softened butter, brown sugar, and granulated sugar until light and fluffy—this should take about 2–3 minutes using a stand or hand mixer on medium speed.
Add in the eggs, one at a time, mixing well after each addition. Stir in the vanilla extract.
In a separate bowl, whisk together the flour, baking soda, baking powder, and salt. Gradually add the dry ingredients to the wet mixture, beating on low speed until combined.
Fold in the chocolate chips using a spatula. The dough will be thick and a bit sticky.
Step 3: Assemble the Cookies
Using a cookie scoop or your hands, scoop about 2 tablespoons of dough. Flatten it slightly and place one Halloween Oreo on top. Then scoop another 2 tablespoons of dough, flatten it, and place it on top of the Oreo. Carefully mold the dough around the Oreo until it’s fully enclosed. Pinch the edges to seal and roll gently to form a ball.
Repeat with the remaining dough and Oreos.
Step 4: Bake
Place the stuffed cookie dough balls onto your prepared baking sheets, leaving plenty of space (at least 2 inches apart) between each one.
Bake for 12–14 minutes, or until the edges are golden brown and the centers look just slightly underbaked—they’ll continue to cook as they cool.
Step 5: Cool and Serve
Allow the cookies to cool on the baking sheets for 5 minutes before transferring them to a wire rack to cool completely.
These cookies are best enjoyed slightly warm, when the Oreo center is still soft and melty. Serve them with a glass of milk or alongside your favorite Halloween punch.
Tips for Success
1. Don’t Overmix the Dough
Once you add the flour, mix just until combined to keep the dough tender and prevent tough cookies.
2. Chill if Needed
If your kitchen is warm or your dough feels too soft to work with, chill it for 15–30 minutes before stuffing the cookies. This will help the cookies maintain their shape while baking.
3. Use a Cookie Scoop
Using a cookie scoop ensures evenly sized cookies, which bake more consistently and look professional.
4. Customize the Chocolate Chips
Semi-sweet is classic, but feel free to use dark chocolate, milk chocolate, or even add Halloween-themed M&M’s for extra festivity.
Storage and Make-Ahead Tips
Storing
Store the cookies in an airtight container at room temperature for up to 5 days. They’ll stay soft and chewy, especially if you place a slice of bread in the container to retain moisture.
Freezing Baked Cookies
Once completely cooled, these cookies can be frozen in a freezer-safe container for up to 2 months. Thaw at room temperature or microwave for 10–15 seconds for that fresh-baked taste.
Freezing Cookie Dough
Want to make them ahead? Assemble the stuffed cookie dough balls and freeze them on a baking sheet until solid. Transfer to a zip-top bag and freeze for up to 3 months. When ready to bake, place frozen cookie dough balls on a baking sheet and bake at 350°F for 15–17 minutes—no need to thaw.
Variations and Add-Ins
-
Double Chocolate Version: Use a chocolate cookie base instead of the classic one by swapping ½ cup of flour with ½ cup of cocoa powder.
-
Candy Corn Crunch: Add chopped candy corn or festive sprinkles into the dough for a seasonal twist.
-
Pumpkin Spice Kick: Add 1 teaspoon of pumpkin pie spice to the dry ingredients for an autumnal flavor boost.
-
Monster Mash: Stuff with different Halloween Oreo flavors or colors if available. Even the green “Día de los Muertos” Oreos make for a fun variation.
Fun Ways to Serve These Cookies
-
Halloween Party Dessert Table: Stack them on a spooky tiered tray surrounded by plastic spiders and fog for a dramatic effect.
-
Cookie Ice Cream Sandwiches: Slice one in half and stuff with vanilla or pumpkin ice cream for the ultimate Halloween dessert.
-
Trick-or-Treat Favors: Wrap individual cookies in clear bags with Halloween ribbon and give them out as party favors or treats for guests.
-
DIY Cookie Bar: Serve alongside other Halloween cookies and toppings like melted chocolate, crushed Oreos, and sprinkles for a build-your-own dessert station.
Frequently Asked Questions (FAQs)
Can I use regular Oreos instead of Halloween Oreos?
Absolutely! Halloween Oreos just add a festive color, but the recipe works beautifully with any Oreo variety.
My cookies spread too much—what went wrong?
This often happens if the dough is too warm. Try chilling the cookie dough before baking, or ensure your butter isn’t too soft when starting.
Can I make mini versions?
Yes! Use smaller scoops of dough and mini Oreos for bite-sized versions. Bake for 9–11 minutes instead.
Are these cookies nut-free?
Yes, as long as your chocolate chips and Oreos are manufactured in nut-free facilities. Always check labels if allergies are a concern.
The Halloween Cookie Worth Sharing
These Halloween Oreo Stuffed Chocolate Chip Cookies are the kind of treat that gets people talking. Whether you’re bringing them to a Halloween potluck, making them as a family activity, or baking a batch for yourself, they’re bound to bring smiles and satisfy every sweet tooth.
Not only do they taste amazing, but they also capture the spirit of Halloween in every gooey, chocolatey, orange crème-filled bite. And let’s be honest—what’s better than two cookies in one?
So grab your apron, your favorite Halloween playlist, and a pack of those bright orange Oreos—it’s time to bake up some spooky magic.