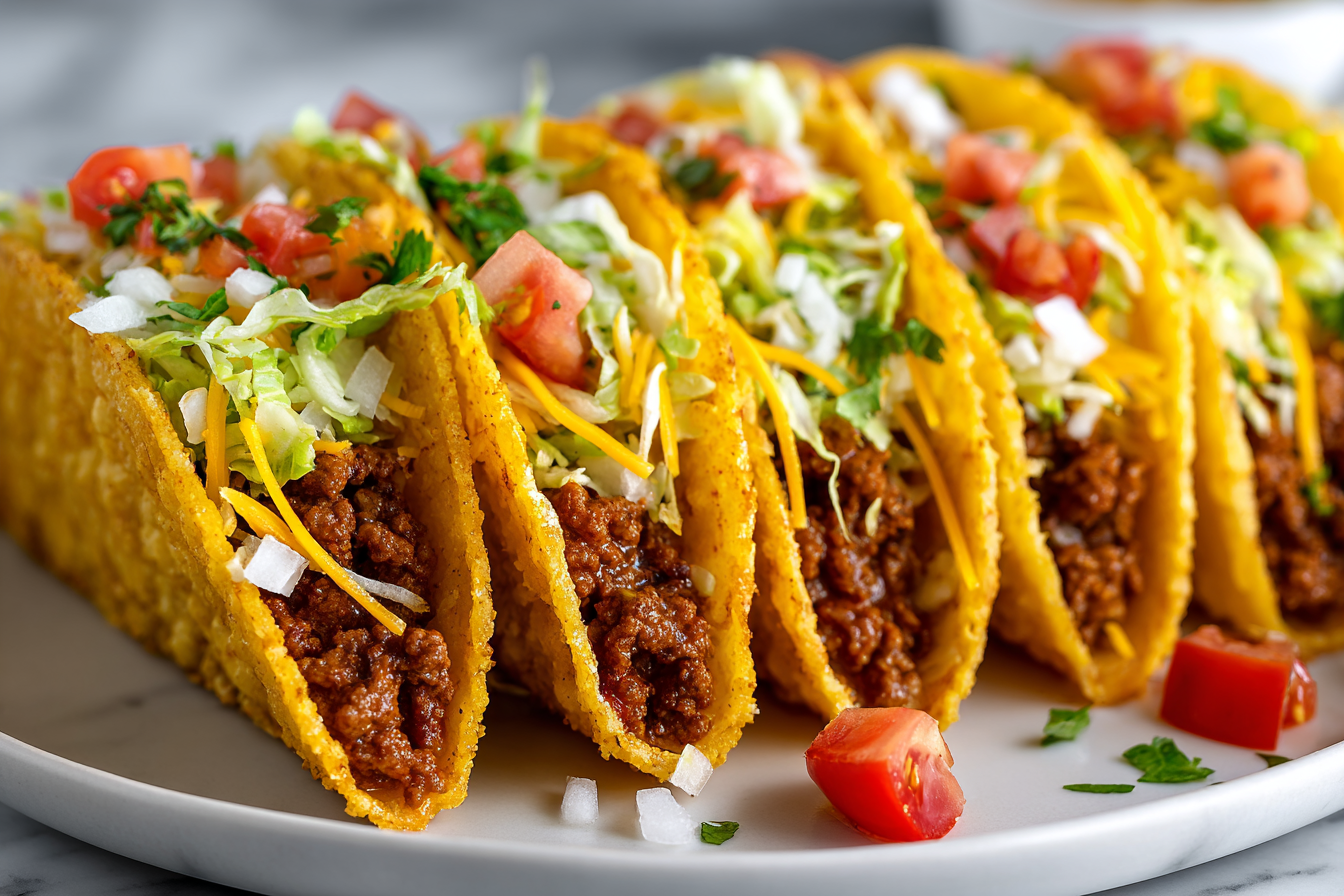
Cheesy Oven-Baked Tacos bring together everything you love about taco night in one easy, hands-off dish. Crisp taco shells hold seasoned beef, melty cheese, and warm tortillas that bake together into a perfectly golden, slightly crunchy bite. As they cook in the oven, the cheese melts into the filling, and the shells become toasted and sturdy without frying.
Unlike stovetop tacos that need constant assembling, Cheesy Oven-Baked Tacos are filled all at once, lined up in a baking dish, and finished in the oven. The result is evenly melted cheese, warm seasoned meat, and shells that stay crisp on the outside while holding their shape.
This recipe is ideal for busy weeknights, casual gatherings, or feeding a crowd. The oven does the work while you prepare toppings, making dinner feel simple, flavorful, and satisfying.
Ingredients Overview
Each ingredient in Cheesy Oven-Baked Tacos plays a specific role in texture and flavor.
Ground beef is the traditional choice for taco filling. An 80/20 blend provides enough fat for flavor without becoming greasy. If you prefer leaner meat, 90/10 works well, though you may want to add a small splash of broth to maintain moisture.
Taco seasoning gives the beef its classic blend of spices, including chili powder, cumin, garlic powder, and paprika. You can use a store-bought blend or make your own to control salt levels.
Tomato sauce or a small amount of salsa adds moisture to the meat mixture. This prevents the filling from drying out during baking and helps it bind together.
Hard taco shells are key for structure. Choose sturdy shells that can stand upright in a baking dish. Baking them briefly before filling can add extra crispness.
Shredded cheese creates the signature melt. A blend of cheddar and Monterey Jack works beautifully, offering both sharpness and smooth melting. Freshly shredded cheese melts more evenly than pre-shredded varieties.
Optional toppings like shredded lettuce, diced tomatoes, sour cream, sliced jalapeños, and chopped cilantro add freshness and contrast after baking.
Step-by-Step Instructions
Preheat your oven to 400°F. Lightly grease a 9×13-inch baking dish to prevent sticking.
In a large skillet over medium heat, cook 1 pound of ground beef until browned, breaking it apart with a spoon. This usually takes about 6 to 8 minutes. Drain excess grease if needed.
Add 2 tablespoons of taco seasoning and 1/3 cup tomato sauce or salsa to the beef. Stir well and let the mixture simmer for 3 to 4 minutes until slightly thickened. The filling should be moist but not watery.
Arrange the taco shells upright in the prepared baking dish. Placing them snugly together helps them stay upright during filling and baking.
Sprinkle a small layer of shredded cheese into the bottom of each shell. This creates a barrier that helps prevent the shells from becoming soggy.
Spoon the seasoned beef evenly into each shell, filling them about three-quarters full. Top generously with additional shredded cheese.
Place the baking dish in the preheated oven and bake for 8 to 10 minutes, or until the cheese is fully melted and the edges of the shells are lightly toasted. Watch carefully to avoid overbrowning.
Remove from the oven and let the tacos cool for a few minutes. The cheese will set slightly, making them easier to handle.
Add fresh toppings just before serving. This contrast between warm filling and cool toppings creates a balanced bite.
Common mistakes include overfilling the shells, which can cause them to split, or adding too much liquid to the meat mixture, which may soften the shells.
Tips, Variations & Substitutions
Ground turkey or shredded chicken can easily replace beef. If using turkey, add a tablespoon of olive oil while cooking to maintain moisture.
For a vegetarian option, substitute black beans or seasoned lentils for the meat. Drain and rinse canned beans thoroughly before heating with taco seasoning.
If you prefer a softer texture, wrap the filled tacos loosely in foil before baking. This traps steam and keeps the shells tender rather than crisp.
For extra richness, stir a few tablespoons of cream cheese into the warm beef mixture before filling the shells.
A sprinkle of sliced green onions or a squeeze of fresh lime juice before serving brightens the flavors.
Serving Ideas & Occasions
Cheesy Oven-Baked Tacos pair well with Mexican-style rice, refried beans, or a simple side salad with lime vinaigrette.
They are perfect for family dinners, game nights, or casual gatherings. Because they can be assembled all at once, they are convenient for serving multiple people without standing at the stove.
Set up a topping station so everyone can customize their tacos with lettuce, tomatoes, sour cream, and salsa.
Nutritional & Health Notes
Cheesy Oven-Baked Tacos provide protein from the beef and calcium from the cheese. Choosing lean ground beef or turkey reduces overall fat content.
Adding fresh toppings such as lettuce and tomatoes increases fiber and vitamins. Portion control and balanced sides help create a well-rounded meal.
Using whole-grain taco shells or adding beans to the filling can increase fiber content while maintaining flavor.
As with many comfort dishes, enjoying in moderation allows this meal to fit comfortably into a varied eating pattern.
FAQs
1. Can I make Cheesy Oven-Baked Tacos ahead of time?
You can prepare the beef filling ahead and store it in the refrigerator for up to two days. Assemble and bake the tacos just before serving to keep the shells crisp.
2. How do I keep taco shells from getting soggy?
Sprinkling cheese at the bottom of each shell before adding meat creates a protective layer. Also, avoid adding too much liquid to the beef mixture.
3. Can I freeze these tacos?
It is best to freeze the meat filling separately. Assembled tacos may lose their crisp texture after freezing and reheating.
4. What type of cheese melts best?
Cheddar and Monterey Jack melt smoothly. A Mexican-style blend also works well.
5. Can I use soft tortillas instead?
Yes. Place filled soft tortillas in a baking dish and bake until the cheese melts. The texture will be softer and more like enchiladas.
6. How long do leftovers last?
Store leftover filling in an airtight container in the refrigerator for up to three days. Reheat gently before assembling fresh shells.
7. Can I add beans to the beef mixture?
Yes. Stir in drained black beans or pinto beans for extra texture and fiber.
Print
Cheesy Oven-Baked Tacos: 5 Crispy, Savory Layers
Description
Cheesy Oven-Baked Tacos are crisp taco shells filled with seasoned beef and melted cheese, baked until golden and ready for fresh toppings.
Ingredients
1 pound ground beef
2 tablespoons taco seasoning
1/3 cup tomato sauce or salsa
12 hard taco shells
2 cups shredded cheddar and Monterey Jack cheese
Optional toppings: shredded lettuce, diced tomatoes, sour cream, chopped cilantro
Instructions
-
Preheat oven to 400°F and lightly grease a 9×13-inch baking dish.
-
Brown ground beef in a skillet and drain excess grease.
-
Stir in taco seasoning and tomato sauce. Simmer 3 to 4 minutes.
-
Arrange taco shells upright in baking dish.
-
Add a small layer of cheese to each shell.
-
Fill with beef mixture and top with remaining cheese.
-
Bake 8 to 10 minutes until cheese is melted and shells are crisp.
-
Cool slightly and add desired toppings before serving.
Notes
Do not overfill shells to prevent cracking. Add fresh toppings after baking for best texture.