Diving into the world of pasta can be an adventure of its own, especially when it comes to exploring lesser-known shapes that hold centuries of tradition and culinary innovation. Among these, cavatelli emerges as a pasta shape that combines simplicity with a deep-rooted history, inviting both novice and seasoned cooks into the art of Italian pasta making. This article embarks on a journey to uncover the secrets of making authentic cavatelli, offering insights into its origins, the step-by-step process of crafting it from scratch, and innovative ways to serve this delightful pasta. Whether you’re a pasta aficionado or a curious cook looking to expand your culinary repertoire, this guide promises to enrich your understanding and appreciation of cavatelli, turning pasta night into an exploration of Italian culinary tradition.
Understanding Cavatelli: A Classic Pasta with Deep Roots
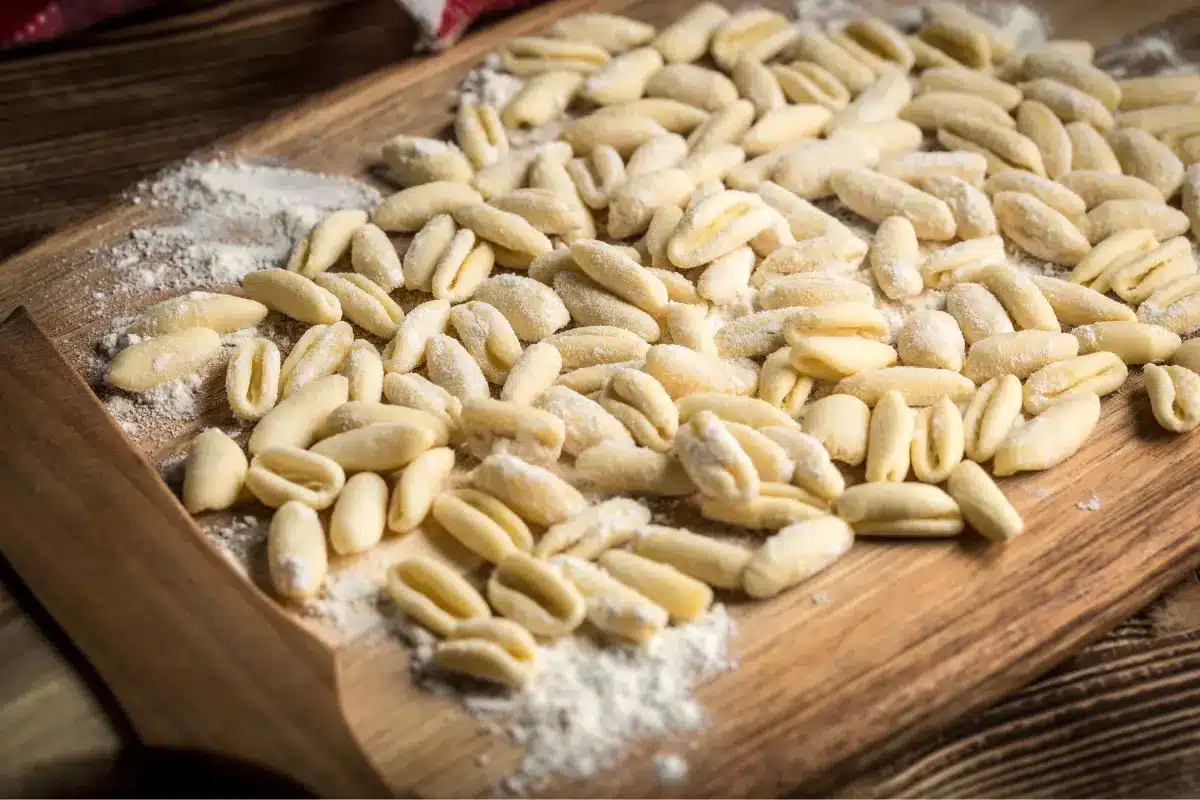
Cavatelli holds a special place in the heart of Italian cuisine, a testament to the simplicity and ingenuity of traditional pasta making. Originating from the southern regions of Italy, this pasta boasts a unique shape reminiscent of small, hollowed bread rolls. Its name, intriguingly, derives from the Italian word “cavato,” meaning “hollowed out,” which perfectly describes its signature appearance. This pasta’s ability to cradle sauces and gravies makes it not just a dish but an experience, inviting a burst of flavor with every bite.
The Origin and Cultural Significance of Cavatelli
Delving into the origins of cavatelli is like taking a step back in time, to when pasta was not just food but a symbol of culture and community. Its roots in the southern Italian landscape are intertwined with stories of family gatherings, where making pasta from scratch was not just a culinary activity but a communal ritual. The simplicity of its ingredients – traditionally just semolina flour and water – belies the depth of skill and tradition required to shape each piece by hand, making it a true embodiment of artisanal pasta making.
What Makes Cavatelli Unique?
What sets recipe apart is not just its shape but also its versatility and texture. Unlike its more uniform cousins, cavatelli’s hand-rolled, grooved surface makes it exceptional at holding onto sauces, from the robust and hearty to the light and creamy. This characteristic, combined with its satisfying chewiness, allows cavatelli to stand out in a sea of pasta shapes, offering a unique taste and texture profile that is both comforting and sophisticated.
Transitioning from its historical roots to the practical aspects of making cavatelli at home, this guide aims to demystify the process, making it accessible and enjoyable for everyone. As we move forward, we’ll explore the essential ingredients and tools you’ll need, delve into the step-by-step process of crafting the perfect dough, and share tips and tricks for shaping, cooking, and serving cavatelli that will impress your family and friends. Stay tuned as we embark on this culinary journey, celebrating the joy of homemade pasta.
Ingredients and Equipment
Embarking on your cavatelli-making adventure begins with gathering the right ingredients and equipment. The beauty of cavatelli lies in its simplicity, both in terms of its components and the tools needed to bring it to life. Below, you’ll find a concise list of what you’ll need to start your journey into making this delightful pasta. Let’s dive in!
Preparing for Your Cavatelli Recipe
Essential Ingredients for Authentic Cavatelli
- 300 g semolina flour
- 160 g water
- Optional: 1/2 teaspoon ground turmeric (for color and flavor)
- Optional: 1/2 teaspoon freshly ground black pepper (for a spicy kick)
Required Tools and Equipment
At the heart of cavatelli-making is the cavatelli maker, a simple yet ingenious tool that transforms dough into the pasta’s characteristic shape. While it’s possible to shape cavatelli by hand, using a recipe maker ensures uniformity and speed, making the process more efficient and enjoyable. Additionally, a rolling pin is indispensable for flattening the dough before it’s cut and shaped. Together, these tools bridge tradition and modern culinary practices, turning simple ingredients into a pasta masterpiece.
Transitioning from ingredients to action, the next part of our journey will guide you through the process of crafting the perfect dough for your cavatelli. This foundational step is crucial in achieving the pasta’s signature texture and flavor, setting the stage for a delicious and authentic Italian culinary experience. Stay with us as we continue to explore the art and science of homemade cavatelli, a journey that promises not only to enrich your cooking repertoire but also to bring a taste of Italy into your home.
The Cavatelli Dough Recipe
Crafting the perfect cavatelli dough is an art that balances simplicity with a touch of culinary finesse. The journey to mastering this dough begins with understanding its basic components and then delving into the hands-on process of mixing, kneading, and resting. This section guides you through each step, ensuring your cavatelli dough is nothing short of perfect.
Crafting the Perfect Cavatelli Dough
The foundation of any great pasta starts with the dough. For cavatelli, this means a dough that’s firm yet pliable, capable of being shaped into those distinctive grooves that make this pasta so special. Achieving this texture involves a simple mix of ingredients and a bit of patience during the kneading process.
Ingredients:
- 300g semolina flour
- 160g water
- A pinch of fine sea salt
- Optional: 1/2 teaspoon ground turmeric for color
- Optional: 1/2 teaspoon freshly ground black pepper for flavor
Step-by-Step Dough Preparation
- Combine Ingredients: Start by mixing the semolina flour and salt in a large bowl. Gradually add water, stirring until a shaggy dough begins to form. If you’re opting to add turmeric and black pepper, now’s the time to sprinkle them in.
- Knead the Dough: Transfer the dough onto a clean, flat surface. Knead with the heels of your hands, pushing the dough away from you, then folding it back over itself. Continue this process for about 7-10 minutes, until the dough is smooth and elastic. If the dough feels too dry, add a tad more water; if too sticky, a light dusting of semolina flour will do the trick.
- Resting Time: Shape the kneaded dough into a ball and wrap it in plastic wrap or place it in a covered bowl. Let it rest at room temperature for at least 30 minutes. This resting phase allows the gluten strands to relax, making the dough more pliable and easier to shape.
Tips for Achieving the Right Dough Consistency
- Feel the Dough: Trust your senses. The dough should feel firm but not dry, and it should have a slight tackiness without sticking to your hands.
- Adjust as You Go: Don’t be afraid to adjust the water or flour as you knead. The exact amount can vary depending on the humidity and the absorption rate of your flour.
- Patience is Key: Kneading develops the gluten, which gives the pasta its texture. Don’t rush this step; take your time to achieve that silky smoothness.
Mastering the cavatelli dough is the first step toward creating delicious, homemade pasta that’s steeped in tradition yet infused with your personal touch. With these guidelines, you’re well on your way to turning simple ingredients into an extraordinary meal that celebrates the joy of cooking from scratch. Next, we’ll dive into the techniques for shaping your cavatelli and ensuring they come out perfectly every time. Stay tuned for an exploration of the tactile pleasure and satisfaction that comes from crafting your own pasta shapes by hand.
Shaping and Cooking Cavatelli
Once your cavatelli dough has rested and you’re armed with the knowledge of its proper consistency, it’s time to dive into the heart of the matter—shaping those charming, grooved pieces of pasta. This part of the process is where the magic happens, transforming a simple dough into the distinctive shapes that define cavatelli. Following that, we’ll guide you through the cooking process to ensure your pasta is perfectly al dente.
Mastering the Art of Shaping Cavatelli
Shaping recipe can be a therapeutic activity, one that connects you to the centuries-old tradition of handmade pasta. Whether you’re using a cavatelli maker or shaping by hand, the goal is to create those characteristic grooves that not only define its appearance but also help to catch and hold onto your sauce.
How to Shape Cavatelli With or Without a Machine
- Using a Cavatelli Maker: If you have a cavatelli maker, cut the rested dough into strips about 3/4-inch wide. Feed each strip through the machine, applying gentle pressure to ensure the dough catches on the rollers and forms the cavatelli’s signature grooves. Collect the shaped pasta on a floured surface to prevent sticking.
- Shaping by Hand: No cavatelli maker? No problem! You can still achieve beautiful results by hand. Cut the dough into small pieces, approximately the size of a cherry. Using a butter knife or the edge of a fork, press down on each piece and roll it towards you, allowing the dough to curl naturally into shape. The back of the pasta will have the grooves from the knife or fork, perfect for holding onto your favorite sauce.
Boiling to Perfection: Cooking Your Cavatelli
Cooking cavatelli is as straightforward as it gets in pasta making, yet the key lies in timing to achieve that sought-after al dente texture.
- Boil Water: Bring a large pot of salted water to a rolling boil. The salt enhances the pasta’s flavor, so don’t be shy with it.
- Cook the Pasta: Gently drop the cavatelli into the boiling water. Since they tend to cook relatively quickly, keep an eye on them. They’ll start to float to the surface after about 2-3 minutes, a telltale sign they’re nearing readiness.
- Taste Test: The best way to know if your cavatelli is perfectly cooked is to taste it. Look for a tender exterior with a slight bite in the center—true al dente.
- Drain and Serve: Once cooked to your liking, drain the cavatelli, reserving a cup of the pasta water for your sauce if needed. Toss them with your chosen sauce, allowing the grooves to work their magic by holding onto every bit of flavor.
With your cavatelli shaped and cooked to perfection, you’re ready to move on to the final touches that will turn your pasta into a memorable meal. The beauty of cavatelli lies in its versatility, ready to be paired with an array of sauces and ingredients. Whether dressed in a simple tomato sauce or combined with roasted vegetables and herbs, cavatelli offers a canvas for your culinary creativity. In the next section, we’ll explore various ways to serve and enjoy your homemade cavatelli, elevating it from a simple pasta dish to a gourmet delight.
Variations and Serving Suggestions
Cavatelli, a versatile pasta, offers a canvas for diverse flavors. This section explores creative ways to enhance recipe. It invites personal touches that transform the dish into a culinary delight.
Creative Cavatelli: Variations and Flavors
Starting with the basic recipe, you can introduce spices or vibrant ingredients. This enriches the pasta’s taste and appearance, making each dish unique.
Adding Color and Flavor: Turmeric and Black Pepper
By adding turmeric, you infuse the dough with a golden hue and earthy notes. Black pepper introduces a sharp bite. Together, they not only boost the flavor but also create an eye-catching presentation.
Ingredients for Variation:
- Turmeric (1/2 teaspoon): Adds color and flavor.
- Black pepper (1/2 teaspoon): Gives an aromatic kick.
Serving Suggestions: Pairing with Sauces and Vegetables
Cavatelli’s shape makes it ideal for various sauces and ingredients. Here are a few ideas:
- Roasted Vegetable Cavatelli: Combine with roasted zucchini, bell peppers, and tomatoes. Finish with olive oil and Parmesan for a simple, hearty meal.
- Pesto Cavatelli: A pesto sauce brings freshness and herbaceous flavors. It clings to the pasta, ensuring each bite is flavorful.
- Creamy Mushroom Cavatelli: Elevate your meal with a rich, creamy mushroom sauce. It’s perfect for special occasions or indulgent dinners.
These suggestions are just the beginning. Experiment with textures and flavors to find the perfect combination. With cavatelli as your base, the possibilities are endless. Next, we’ll share tips on storing your homemade pasta. This ensures you can savor your creations anytime the craving strikes.
Storing and Freezing Cavatelli

FAQ
Towards the end of our comprehensive guide to making, serving, and storing recipe. it’s time to address some frequently asked questions. These queries capture common uncertainties and challenges faced by both novice and experienced pasta makers. By clarifying these points, we aim to enhance your cavatelli-making experience, ensuring it’s as smooth and enjoyable as possible.
Can I Make Cavatelli Without a Machine?
Absolutely! While a recipe maker simplifies the process and ensures uniformity, you can certainly make recipe by hand. Use a small knife or the tines of a fork to roll and press the dough pieces, creating the characteristic cavatelli shape with the grooves. This manual method not only connects you to the traditional way of making cavatelli but also allows for a more personal touch in each piece of pasta.
What Flour Is Best for Cavatelli?
Traditionally, cavatelli is made with semolina flour, derived from durum wheat, which gives the pasta its distinct texture and flavor. However, if semolina flour isn’t available, you can use all-purpose flour or a mix of all-purpose and “00” flour. Each type of flour will result in a slightly different texture, so feel free to experiment to find your preference.
How Do I Prevent My Cavatelli from Sticking?
Preventing cavatelli from sticking is crucial, especially when storing or freezing. Ensure each piece is well-floured before laying them out to dry or freeze. When freezing, spread the cavatelli on a baking sheet in a single layer. and once frozen solid, transfer them to a freezer bag or container. This method prevents them from sticking together, making it easy to cook only what you need later on.