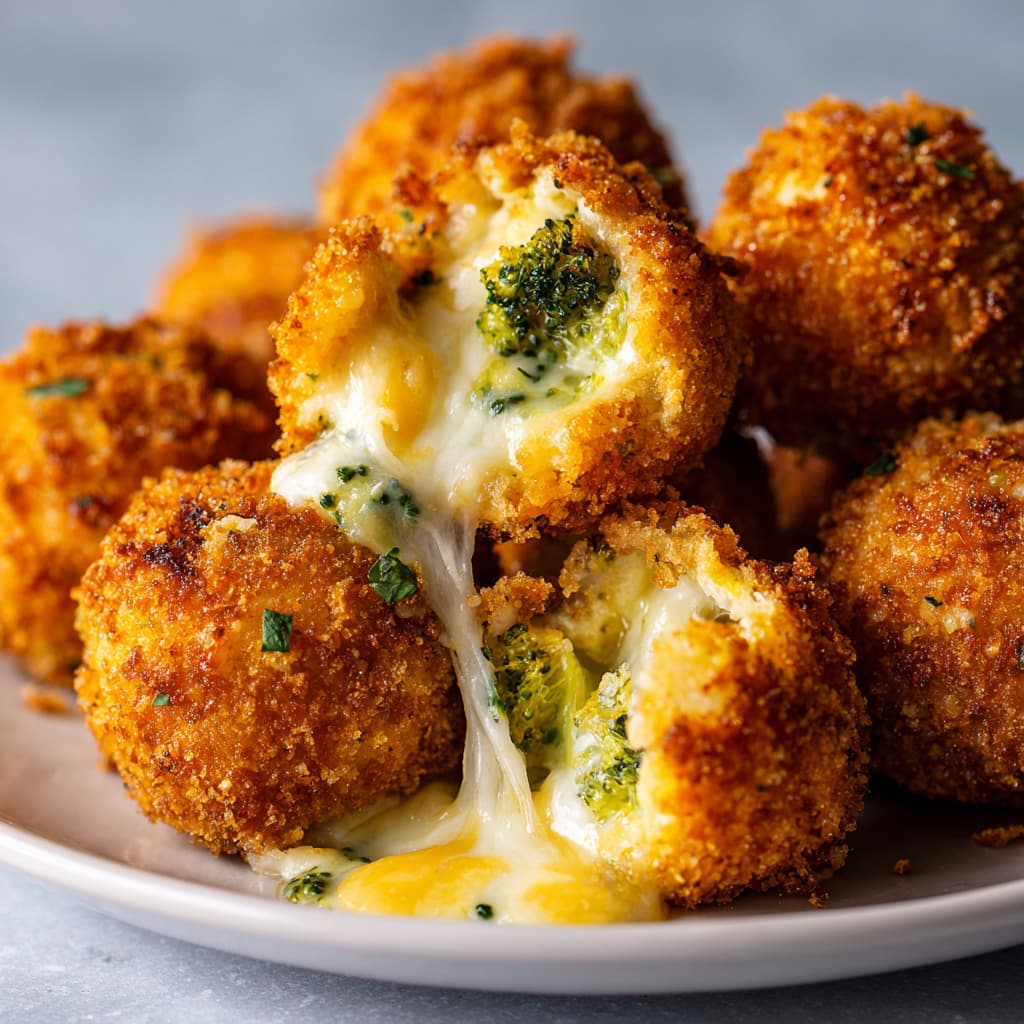
There are certain recipes that win hearts at first bite, and Baked Broccoli Cheese Balls are one of them. Crispy on the outside, gooey and cheesy on the inside, these bite-sized delights make the perfect appetizer, snack, or even a fun side dish. The best part? They’re baked, not fried, making them lighter while still delivering all the satisfying crunch and flavor you crave.
Broccoli cheese balls have become popular at parties, game days, and family dinners because they’re universally loved — even by picky eaters who aren’t big fans of broccoli. When combined with melted cheese, breadcrumbs, and seasonings, broccoli transforms into a crave-worthy snack that disappears quickly from any serving platter.
This article will guide you through every step of making these delicious bites, from selecting the best cheese to achieving that perfect golden-brown crust in the oven. We’ll also explore variations, serving ideas, storage tips, and answer the most common questions to ensure your broccoli cheese balls turn out perfect every time.
Why You’ll Love This Recipe
-
Kid-friendly: A sneaky, tasty way to get more veggies on the plate.
-
Healthier than fried: Crispy texture without deep frying.
-
Versatile: Serve as appetizers, sides, or snacks.
-
Customizable: Use different cheeses, seasonings, or coatings.
-
Meal-prep friendly: Make ahead, bake later, or freeze for quick snacks.
Ingredients You’ll Need
Main Ingredients
-
Broccoli florets – Steamed or blanched, then finely chopped.
-
Cheese – Cheddar is classic, but mozzarella, Parmesan, or pepper jack add variety.
-
Breadcrumbs – Panko for extra crunch, or regular for a softer coating.
-
Eggs – Binds ingredients together.
-
Flour – Helps form the mixture and prevents sogginess.
-
Onion and garlic powder – For savory depth.
-
Salt and pepper – To taste.
For the Coating
-
Breadcrumbs – To coat the outside for crispiness.
-
Cooking spray or olive oil – Ensures even browning when baked.
Optional Add-Ins
-
Chopped herbs – Parsley, dill, or basil for freshness.
-
Spices – Paprika, chili flakes, or cumin for a flavor twist.
-
Other veggies – Grated carrot or zucchini (squeezed dry) can be added.
Step-by-Step Instructions
Step 1: Prepare the Broccoli
-
Steam or blanch broccoli florets until tender but still bright green (about 3–4 minutes).
-
Drain well and pat dry with paper towels to remove excess moisture.
-
Chop finely into small pieces.
Step 2: Make the Mixture
-
In a large bowl, combine chopped broccoli, shredded cheese, breadcrumbs, flour, onion powder, garlic powder, salt, and pepper.
-
Add lightly beaten eggs and mix until well combined.
-
If mixture feels too wet, add more breadcrumbs; if too dry, add a splash of milk.
Step 3: Shape the Balls
-
Scoop about 1–2 tablespoons of mixture and roll into balls.
-
Place on a parchment-lined baking sheet.
Step 4: Coat for Crispiness
-
Roll each ball lightly in breadcrumbs.
-
Arrange evenly on the baking sheet.
-
Spray lightly with cooking spray or drizzle with olive oil.
Step 5: Bake
-
Preheat oven to 400°F (200°C).
-
Bake for 18–22 minutes, turning once halfway through.
-
Broccoli cheese balls should be golden brown and crispy on the outside.
Step 6: Serve
-
Serve warm with dipping sauces like marinara, ranch, or garlic aioli.
Tips for Success
-
Dry broccoli well: Excess water will make the mixture soggy.
-
Don’t skip the coating: The breadcrumb layer gives the best crunch.
-
Use parchment paper: Prevents sticking and makes cleanup easier.
-
Space balls apart: Ensures even baking and browning.
-
Serve immediately: Best enjoyed fresh while the cheese is gooey.
Variations to Try
-
Cheese swap: Use sharp cheddar for bold flavor, mozzarella for stretchy gooeyness, or pepper jack for a spicy kick.
-
Gluten-free: Use almond flour or gluten-free breadcrumbs.
-
Low-carb option: Replace breadcrumbs with crushed pork rinds or almond meal.
-
Stuffed surprise: Hide a cube of cheese inside each ball for an extra melty center.
-
Air fryer version: Cook at 375°F (190°C) for 12–15 minutes, flipping halfway, for extra crispiness.
Perfect Pairings
Dipping Sauces
-
Classic marinara – Bright and tangy.
-
Garlic aioli – Creamy and bold.
-
Spicy sriracha mayo – Adds heat.
-
Ranch dressing – A kid-approved favorite.
As a Side Dish
-
Pair with grilled chicken, baked salmon, or roasted meats.
-
Serve alongside pasta or risotto for a hearty meal.
Drinks
-
Sparkling water with lemon – Light and refreshing.
-
Chardonnay – Complements the cheesy richness.
-
Iced tea – Pairs well for casual snacking.
Storing and Reheating
-
Refrigerator: Store in an airtight container for up to 3 days.
-
Freezer: Freeze unbaked or baked balls for up to 2 months.
-
Reheating: Warm in the oven or air fryer until crispy; avoid microwaving as it softens the coating.
Nutritional Information (Per 3 Balls, Approximate)
-
Calories: 180
-
Protein: 8g
-
Fat: 10g
-
Carbohydrates: 14g
-
Fiber: 2g
-
Sugar: 2g
-
Sodium: 320mg
Frequently Asked Questions
Can I make these ahead of time?
Yes! Shape the balls, refrigerate for up to 24 hours, and bake when ready to serve.
Can I use frozen broccoli?
Yes, just thaw completely and squeeze out excess water before using.
Can these be fried instead of baked?
Absolutely — shallow fry in hot oil for 2–3 minutes per side until golden, then drain on paper towels.
How do I keep them from falling apart?
Make sure the mixture isn’t too wet. Adjust with extra breadcrumbs if needed.
Are these good for kids?
Yes — they’re a fun, veggie-packed snack that kids love, especially with dipping sauces.
Bringing It All Together
Baked Broccoli Cheese Balls prove that vegetables can be transformed into irresistible comfort food. With their crispy coating, cheesy interior, and versatility in serving, they’re a recipe worth keeping on repeat. Whether you’re planning a party, preparing after-school snacks, or looking for a creative side dish, these golden bites fit the bill.
They’re healthier than their fried counterparts, easy to customize, and perfect for make-ahead prep. Pair them with your favorite dipping sauce, serve them alongside a main dish, or enjoy them as a stand-alone snack.
Next time you’re craving something savory and satisfying, skip the bag of chips or frozen appetizers and whip up these homemade baked broccoli cheese balls. You’ll quickly discover why they’re always the first thing to disappear at any gathering.
Print
Baked Broccoli Cheese Balls
- Total Time: 35 minutes
- Yield: 4 servings
Description
Crispy on the outside, gooey and cheesy on the inside—baked broccoli cheese balls are the ultimate crowd-pleasing snack or appetizer. They’re perfect for game day, family gatherings, or even as a fun side dish for dinner. Packed with nutrient-rich broccoli and plenty of melted cheese, these golden bites are healthier than the deep-fried version since they’re baked in the oven, yet they don’t sacrifice flavor or crunch. Whether served with a dipping sauce or enjoyed on their own, they’re guaranteed to disappear fast.
Ingredients
-
2 cups broccoli florets, steamed and finely chopped
-
1 cup shredded cheddar cheese
-
1/2 cup grated Parmesan cheese
-
3/4 cup breadcrumbs (plus extra for coating)
-
2 large eggs, lightly beaten
-
2 cloves garlic, minced
-
1/2 teaspoon onion powder
-
1/2 teaspoon paprika
-
Salt and black pepper, to taste
-
Olive oil spray (for baking)
Instructions
-
Preheat oven to 400°F (200°C). Line a baking sheet with parchment paper and lightly spray with olive oil.
-
In a large bowl, combine chopped broccoli, cheddar cheese, Parmesan, breadcrumbs, eggs, garlic, onion powder, paprika, salt, and pepper. Mix until well combined.
-
Scoop out portions of the mixture and roll into 1-inch balls. If the mixture is too loose, add a little more breadcrumbs.
-
Roll each ball in additional breadcrumbs to coat. Place on the prepared baking sheet.
-
Lightly spray the tops with olive oil for extra crispiness.
-
Bake for 18–20 minutes, turning once halfway through, until golden brown and crisp.
-
Serve warm with ranch, marinara, or your favorite dipping sauce.
- Prep Time: 15 minutes
- Cook Time: 20 minutes


