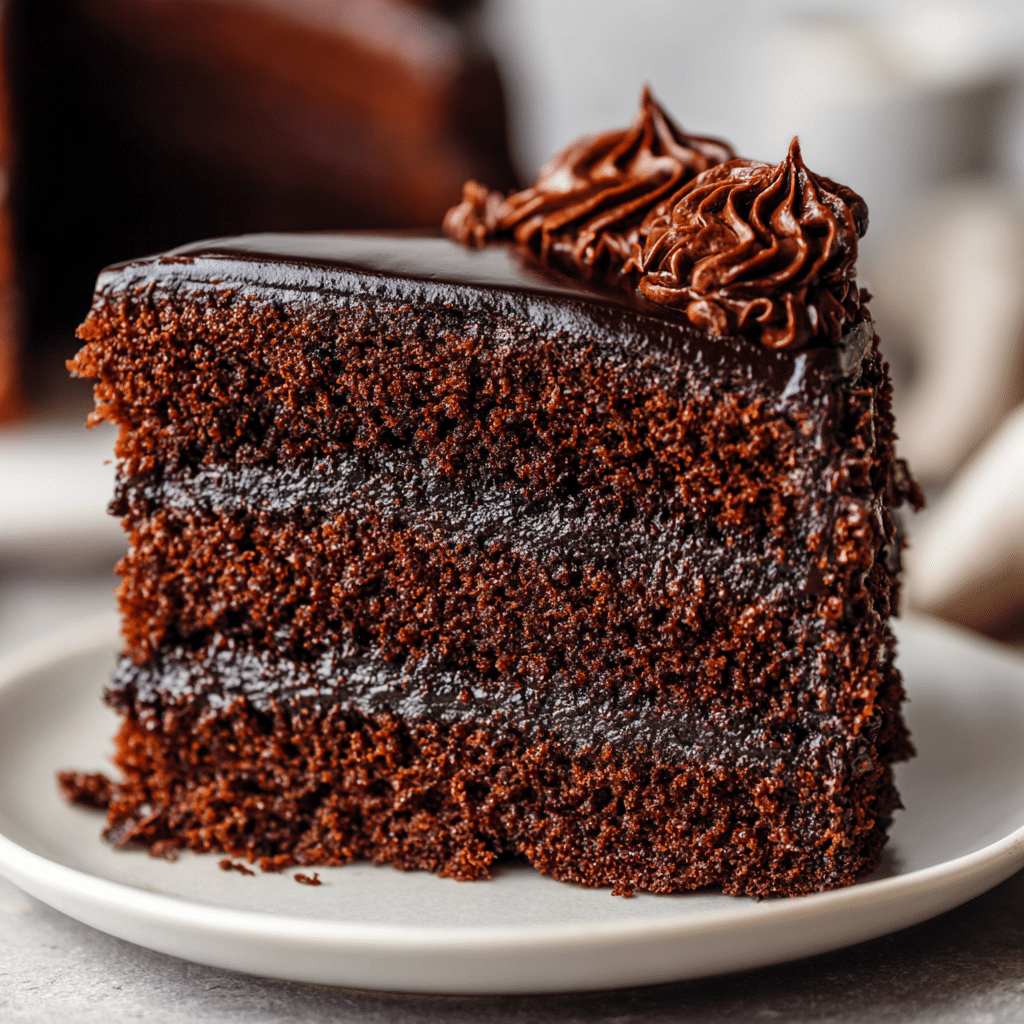
There’s something irresistibly luxurious about a Black Velvet Cake. With its dark, rich color and moist, tender crumb, this cake is made for indulgent evenings, elegant gatherings, or simply when you’re craving a show-stopping dessert. Whether it’s a Halloween party, a sophisticated dinner, or a moody winter celebration, this cake brings both drama and flavor to the table.
The inspiration for this recipe stems from the timeless Red Velvet Cake — a Southern classic known for its vibrant color and subtle cocoa flavor. But the Black Velvet Cake? It takes things a step further, embracing boldness and mystery with its striking appearance and intensified chocolate notes. It’s not just a dessert — it’s an experience.
What Is Black Velvet Cake?
Black Velvet Cake is a unique variation of the traditional velvet cake. While Red Velvet has its signature red hue and tangy undertones from buttermilk and vinegar, Black Velvet is deeper, darker, and bolder. The cocoa flavor is richer, and the black coloring gives it an elegant, gothic edge. Often paired with a contrasting white or cream cheese frosting, this cake is both visually dramatic and deliciously satisfying.
Unlike many dark cakes that can be dry or overly sweet, Black Velvet Cake remains soft, balanced, and perfectly moist. The key lies in the careful combination of buttermilk, vinegar, and dark cocoa powder, which work together to create a velvet-like texture and layered flavor profile.
Why You’ll Love This Black Velvet Cake
-
Visually Stunning: The deep black crumb paired with a light, creamy frosting makes this cake a dramatic centerpiece for any event.
-
Perfectly Moist: Thanks to buttermilk and oil, the texture stays soft and tender for days.
-
Rich Chocolate Flavor: Using dark or black cocoa powder elevates the chocolate notes while keeping it balanced.
-
Versatile Occasions: Ideal for Halloween, birthdays, gothic weddings, or dinner parties.
-
Frosting Flexibility: Pairs beautifully with cream cheese frosting, Swiss meringue buttercream, or even whipped mascarpone.
Ingredients You’ll Need
For the Black Velvet Cake:
-
2 ½ cups (312g) all-purpose flour
-
½ cup (40g) black cocoa powder (or a mix of dark and black cocoa)
-
1 tsp baking soda
-
½ tsp baking powder
-
½ tsp salt
-
1 ¾ cups (350g) granulated sugar
-
1 cup (240ml) vegetable oil
-
2 large eggs, room temperature
-
1 cup (240ml) buttermilk, room temperature
-
1 tbsp white vinegar
-
1 tbsp vanilla extract
-
1 tbsp black food coloring (gel preferred)
For the Cream Cheese Frosting:
-
16 oz (450g) cream cheese, softened
-
½ cup (115g) unsalted butter, softened
-
4 cups (480g) powdered sugar, sifted
-
2 tsp vanilla extract
-
Pinch of salt
Note: You can substitute mascarpone or Swiss meringue buttercream for the frosting depending on your taste preference.
Step-by-Step Instructions
1. Prepare Your Baking Pans
Preheat your oven to 350°F (175°C). Grease and line three 8-inch round cake pans with parchment paper. Set aside.
2. Mix the Dry Ingredients
In a large bowl, sift together:
-
All-purpose flour
-
Black cocoa powder
-
Baking soda
-
Baking powder
-
Salt
Sifting is important when using black cocoa, as it can clump easily. Stir the ingredients to ensure even distribution.
3. Whisk the Wet Ingredients
In a separate bowl, whisk together:
-
Sugar
-
Vegetable oil
-
Eggs
-
Buttermilk
-
Vinegar
-
Vanilla extract
-
Black food coloring
Mix until well combined and smooth. The batter will turn a deep, almost ink-like black — don’t worry, that’s exactly what you want.
4. Combine Wet and Dry
Gradually add the dry ingredients to the wet mixture in batches. Stir just until combined. Avoid overmixing, which can lead to a tougher cake texture.
5. Divide and Bake
Pour the batter evenly into the prepared pans. Tap the pans gently on the counter to release any air bubbles.
Bake for 25–30 minutes or until a toothpick inserted into the center comes out clean or with a few moist crumbs.
Let the cakes cool in their pans for 10–15 minutes, then transfer to a wire rack to cool completely.
How to Make the Cream Cheese Frosting
-
In a large bowl, beat the softened cream cheese and butter until smooth and creamy.
-
Gradually add the sifted powdered sugar, one cup at a time, beating well between additions.
-
Add vanilla extract and a pinch of salt.
-
Beat the mixture on high for 2–3 minutes until fluffy and spreadable.
Pro Tip: If your frosting is too soft, chill it in the fridge for 10–15 minutes before using.
Assembling the Cake
-
Level the Cake Layers: If the cakes domed in the oven, use a serrated knife to level them for a smooth, stackable surface.
-
Apply a Crumb Coat: Spread a thin layer of frosting over the first layer, add the second layer and repeat. Cover the entire cake with a light coat of frosting to trap crumbs. Chill for 15–30 minutes.
-
Final Frosting Layer: Apply the remaining frosting smoothly over the chilled cake. Use an offset spatula or cake scraper for a professional finish.
-
Optional Decoration: Garnish with black sprinkles, edible glitter, chocolate curls, or blackberries for an elegant touch.
Serving Suggestions
Black Velvet Cake pairs beautifully with:
-
Fresh berries (especially raspberries or blackberries)
-
A cup of strong coffee or espresso
-
A drizzle of salted caramel sauce
-
A glass of red wine or dark port
Serve chilled or at room temperature depending on your preference. The frosting sets beautifully when slightly cold, while the cake is most flavorful at room temp.
Make-Ahead Tips
-
Cake Layers: Bake the layers up to 2 days ahead. Wrap them tightly in plastic wrap and store at room temperature or in the fridge.
-
Frosting: Can be made a day in advance and refrigerated. Bring to room temperature and re-whip before using.
-
Fully Assembled Cake: Can be stored in the fridge for up to 4 days. Cover with a cake dome or store in an airtight container.
Storage and Freezing
-
Refrigerate: Store leftovers in an airtight container in the fridge for up to 5 days.
-
Freeze: Unfrosted cake layers can be frozen for up to 3 months. Wrap tightly in plastic wrap and aluminum foil.
When ready to serve, thaw in the fridge overnight and frost as usual.
Troubleshooting & Tips
Why is my cake dry?
Dryness can result from overbaking or too much flour. Always measure flour using the spoon-and-level method, and check for doneness a few minutes early.
Can I make this into cupcakes?
Absolutely! This recipe yields about 24 cupcakes. Bake at 350°F for 18–20 minutes.
Can I skip the food coloring?
You can, but you’ll lose the dramatic black appearance. The cake will still taste amazing but will appear dark brown instead of jet black.
What cocoa powder should I use?
Use black cocoa powder for the deepest color — it’s ultra-dutched and almost black. Brands like King Arthur Black Cocoa or Valrhona Noir are excellent choices. You can also mix black and regular Dutch-processed cocoa for a more balanced taste.