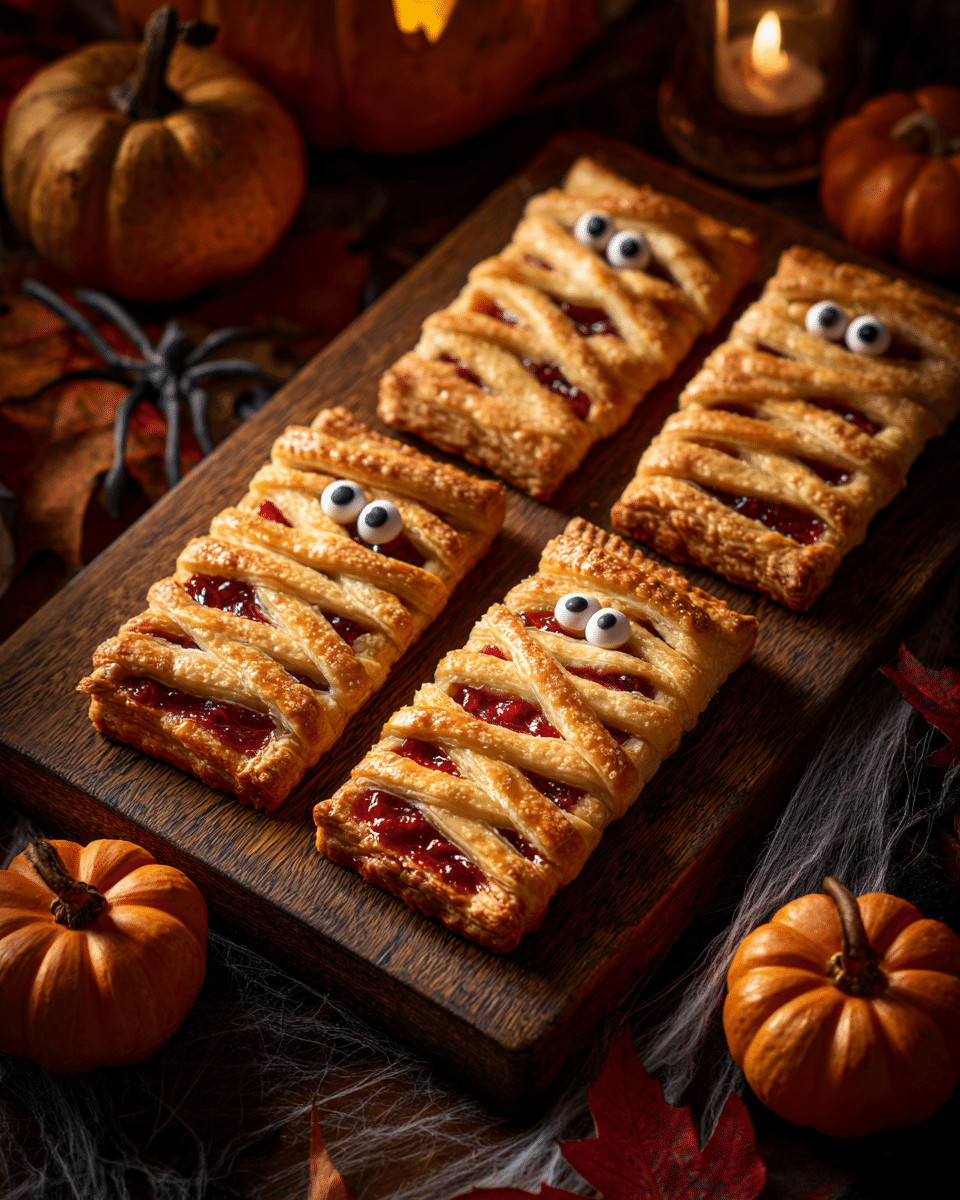
There’s something magical about the crisp autumn air, fallen leaves crunching underfoot, and the excitement of Halloween in the air. It’s a season filled with creativity, warmth, and just a little bit of spooky fun. Whether you’re throwing a Halloween party, planning a themed movie night, or simply looking for a festive baking activity with the kids, these Easy Mummy Cherry Pies are the perfect treat.
Inspired by the playful spirit of Halloween and the nostalgic charm of homemade pastries, this recipe brings together buttery, flaky crusts with the sweet-tart burst of cherry pie filling, all wrapped up in adorable “mummy” designs. They’re easy to make, delightfully spooky, and almost too cute to eat—almost.
Why You’ll Love These Mummy Cherry Pies
These mummy cherry pies are more than just cute—they’re a great combination of taste, texture, and fun. Here are a few reasons you’ll come back to this recipe year after year:
-
Kid-friendly and interactive – Let little hands help with cutting the dough and adding the filling.
-
Quick and easy – With store-bought pie crust and canned cherry filling, there’s no need to spend hours in the kitchen.
-
Perfect for parties – Serve them as handheld desserts at Halloween gatherings, bake sales, or classroom events.
-
Customizable – Swap in your favorite fillings or make them gluten-free with alternative crusts.
Ingredients You’ll Need
You’ll only need a few simple ingredients to bring these spooky pies to life:
For the Mummy Pies:
-
2 refrigerated pie crusts (or homemade, if you prefer)
-
1 can (21 oz) cherry pie filling
-
1 egg (for egg wash)
-
1 tablespoon water
-
Candy eyeballs (optional but highly recommended for the “mummy” effect)
Optional Toppings:
-
Powdered sugar (for dusting)
-
Melted white chocolate or icing (to “mummify” further)
-
Halloween sprinkles
Tip: If you can’t find candy eyeballs, you can use mini chocolate chips or small dots of icing.
Step-by-Step Instructions
Let’s walk through the steps to create these charming little treats. Even beginner bakers will find this recipe approachable.
1. Preheat Your Oven
Set your oven to 375°F (190°C). Line a baking sheet with parchment paper to prevent sticking and make cleanup easier.
2. Roll Out the Pie Crust
On a lightly floured surface, unroll your pie crusts. Use a 3 to 4-inch round cookie cutter (or the rim of a glass) to cut out circles. These will be the base and tops of your mini pies.
You should get about 12 circles from two crusts, giving you 6 mummy pies in total.
3. Add the Filling
Place half of the circles on your prepared baking sheet. Spoon about a tablespoon of cherry pie filling into the center of each. Avoid overfilling to prevent leaks during baking.
4. Create the Mummy Strips
With the remaining dough circles, use a pizza cutter or sharp knife to slice thin strips. These will form the “bandages” for your mummy pies.
5. Assemble the Mummies
Gently lay the strips over the filled bottoms in crisscross patterns, mimicking mummy wrappings. Press the edges down lightly to seal. You can also use a fork to crimp the edges for a decorative touch.
6. Add the Egg Wash
In a small bowl, whisk together the egg and water to create an egg wash. Brush it over the tops of the mummy pies to give them a golden finish.
7. Bake
Bake in the preheated oven for 18–22 minutes, or until the crust is golden brown and the filling is bubbly.
8. Decorate
Once cooled slightly, add candy eyeballs by gently pressing them into the filling where the “eyes” would go. You can also drizzle with white chocolate or dust with powdered sugar for extra flair.
Serving Suggestions
These mini pies are perfect on their own, but if you want to take them to the next level, try these serving ideas:
-
With vanilla ice cream – The contrast between warm pie and cold ice cream is unbeatable.
-
On a spooky dessert board – Combine them with ghost-shaped cookies, chocolate bark, and gummy worms.
-
Wrapped individually – Place in clear treat bags tied with orange ribbon for party favors or classroom treats.
Make-Ahead and Storage Tips
Make-Ahead Options:
-
Unbaked Pies: Assemble the pies and refrigerate for up to 24 hours before baking.
-
Fully Baked Pies: Bake and cool completely, then store in an airtight container.
Storage:
-
Room Temperature: Store in a sealed container for up to 2 days.
-
Refrigerator: Keeps for 4–5 days; reheat in the oven for best texture.
-
Freezer: Freeze baked pies in a single layer, then transfer to a freezer-safe bag. Reheat in the oven at 350°F until warmed through.
Fun Variations to Try
Want to get creative? Here are a few ways to tweak the recipe while keeping it Halloween-ready:
1. Try Different Fillings
-
Apple pie filling with a sprinkle of cinnamon sugar
-
Pumpkin pie filling with mini chocolate chips
-
Nutella and banana slices for a gooey twist
2. Change the Shape
Instead of circles, use Halloween-themed cookie cutters—like pumpkins, bats, or coffins—and wrap them like mummies for an extra festive flair.
3. Make a Giant Mummy Pie
Instead of minis, use the whole pie crust to make one large rectangular mummy pie. Slice and serve it as bars.
Tips for Baking with Kids
This recipe is ideal for involving children in the kitchen. Here’s how to keep it fun and mess-free:
-
Let kids add the cherry filling (with a small spoon to prevent overflow).
-
Pre-cut the strips so younger kids can “mummy wrap” without using sharp tools.
-
Give them their own small section of dough to create custom designs.
-
Let them stick on the candy eyes—it’s the best part!
Bonus Idea: Turn this into a mini baking class. Talk about baking times, what happens in the oven, and how ingredients change when cooked. Learning can be delicious!
Frequently Asked Questions
Can I use homemade cherry pie filling?
Absolutely! Homemade cherry pie filling will taste amazing and add a personal touch. Just make sure it’s thick enough so it doesn’t run out of the pies during baking.
What if I don’t have candy eyes?
You can pipe small dots of white frosting and add chocolate chips or mini M&Ms. You could also use icing pens to draw eyes once the pies have cooled.
Can I make this recipe gluten-free?
Yes. Simply use a gluten-free pie crust (store-bought or homemade) and double-check that your filling is gluten-free.
Do I have to use cherry filling?
Not at all. You can substitute with apple, blueberry, peach, or even savory fillings like cheese and spinach—though you’ll want to skip the candy eyes in that case.
A Halloween Tradition in the Making
As the leaves fall and pumpkins line porches, these Mummy Cherry Pies are destined to become a favorite tradition. They’re quick, fun, and festive—offering the perfect mix of nostalgia and seasonal charm. Whether you’re baking with kids, preparing treats for a crowd, or just getting into the Halloween spirit, these pies deliver on both flavor and fun.
And don’t be surprised if you find yourself making them again before Halloween is even over—they’re just that good.
Share the Spooky Sweetness
If you try this recipe, be sure to share your mummy pies on social media and tag your creations with a fun hashtag like #MummyPieMagic or #SpookyCherryTreats. Your adorable mummies are sure to earn you a few recipe requests (and maybe even a few candy trades).
And don’t forget to pin this recipe for later or bookmark it for your annual Halloween bake-a-thon.