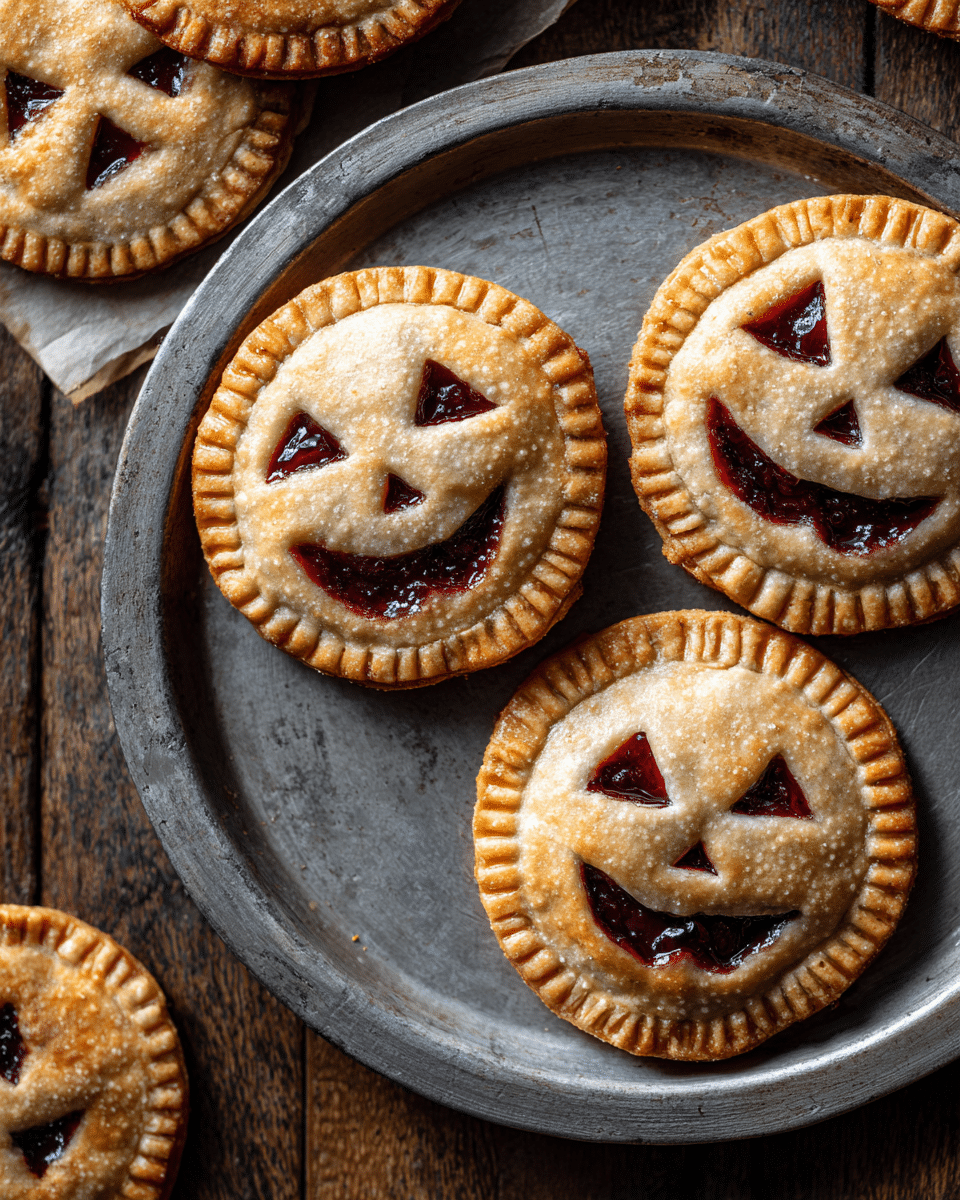
When the crisp air of fall rolls in, and the scent of cinnamon and spice fills your kitchen, there’s no better way to celebrate the season than with homemade treats that are as charming as they are delicious. Enter: Jack-O’-Lantern Hand Pies—a festive and flaky Halloween dessert that brings the spirit of the season to your fingertips.
Perfect for Halloween parties, classroom celebrations, or cozy nights in, these golden, handheld pies are shaped like mini pumpkins with carved faces and filled with warm, spiced filling. Think of them as the pastry version of a carved jack-o’-lantern—adorable, customizable, and completely crave-worthy.
Inspired by nostalgic fall memories of carving pumpkins and baking with family, these hand pies offer the best of both worlds: the fun of Halloween creativity and the comfort of a homemade pie. They’re surprisingly easy to make, and once you see those smiling (or spooky) faces come out of the oven, you’ll want to bake them every fall.
Why You’ll Love These Jack-O’-Lantern Hand Pies
These aren’t just cute—they’re also incredibly satisfying and versatile. Here’s why they’re a must-bake this Halloween:
-
Festive and fun to make – The jack-o’-lantern faces are easy to cut out, even for beginners.
-
Kid-friendly – Let kids design their own spooky or silly pie faces.
-
Customizable filling – Apple cinnamon, pumpkin spice, Nutella, or cherry—choose your favorite.
-
Perfectly portable – Great for school lunches, bake sales, and Halloween treat bags.
-
Make-ahead friendly – Assemble in advance and bake fresh before serving.
If you’re looking for a baking project that doubles as Halloween décor and dessert, this one checks all the boxes.
Ingredients You’ll Need
You only need a handful of ingredients to bring these festive pies to life. Here’s what you’ll need:
For the Pie Dough (or use store-bought):
-
2 ½ cups all-purpose flour
-
1 tsp salt
-
1 tbsp sugar
-
1 cup (2 sticks) cold unsalted butter, cubed
-
6–8 tbsp ice water
Time-saving tip: Store-bought refrigerated pie dough works beautifully if you’re short on time.
For the Filling (Apple Cinnamon Version):
-
2 medium apples, peeled and finely diced
-
2 tbsp brown sugar
-
1 tsp ground cinnamon
-
¼ tsp nutmeg
-
1 tsp lemon juice
-
1 tsp cornstarch (optional, for thickening)
For Assembly:
-
1 egg (for egg wash)
-
1 tbsp milk
-
Raw sugar for sprinkling (optional)
Optional Filling Ideas
-
Pumpkin pie filling (use canned or homemade)
-
Cherry or berry jam
-
Chocolate hazelnut spread
-
Sweetened cream cheese with mini chocolate chips
You can get as creative as you want here—these pies are your canvas.
Equipment You’ll Need
-
Rolling pin
-
3–4 inch pumpkin cookie cutter (or a sharp knife and stencil)
-
Small paring knife or X-acto blade (for carving faces)
-
Pastry brush
-
Baking sheet lined with parchment paper
How to Make Jack-O’-Lantern Hand Pies
Ready to bake? Here’s the step-by-step breakdown:
Step 1: Make or Prepare Your Dough
If using homemade dough:
-
In a large bowl, whisk together flour, salt, and sugar.
-
Cut in the butter using a pastry cutter or your fingers until mixture resembles coarse crumbs.
-
Add ice water 1 tbsp at a time, mixing until dough comes together.
-
Divide into two discs, wrap in plastic, and chill for at least 1 hour.
If using store-bought dough, let it come to room temperature for about 15 minutes before rolling out.
Step 2: Prepare the Filling
For apple cinnamon:
-
Combine diced apples, brown sugar, cinnamon, nutmeg, lemon juice, and cornstarch in a small saucepan.
-
Cook over medium heat for 5–7 minutes until apples are soft and the mixture thickens slightly.
-
Remove from heat and let cool completely.
This filling can be made a day ahead and stored in the fridge.
Step 3: Cut Out the Pumpkin Shapes
-
Roll out one dough disc on a floured surface to about ⅛ inch thick.
-
Use your pumpkin-shaped cookie cutter to cut out as many shapes as possible.
-
Transfer half of the pumpkin shapes to a parchment-lined baking sheet—these will be your bottom layers.
Step 4: Carve the Jack-O’-Lantern Faces
-
Use a small paring knife or X-acto blade to cut eyes, noses, and mouths into the remaining pumpkin cutouts.
-
Get creative—triangle eyes, scary smiles, or goofy grins all work.
-
Try using a toothpick to sketch the design first before cutting.
Step 5: Assemble the Pies
-
Spoon about 1 tablespoon of filling onto the center of each bottom pumpkin cutout.
-
Lightly brush the edges with egg wash (1 egg mixed with 1 tbsp milk).
-
Place a carved pumpkin cutout on top of each filled one, gently pressing edges to seal.
-
Use a fork to crimp the edges for a rustic, finished look.
-
Brush the tops with egg wash and sprinkle with raw sugar if desired.
Step 6: Chill Before Baking
-
Place assembled pies in the refrigerator for 15–20 minutes. This helps the dough firm up and prevents spreading in the oven.
Step 7: Bake Until Golden
-
Preheat oven to 375°F (190°C).
-
Bake hand pies for 20–25 minutes, or until golden brown and flaky.
-
Let cool slightly before serving—but they’re best enjoyed warm!
How to Make a Pumpkin Pie Filling Version
If you’d rather go full pumpkin, try this simple spiced filling:
-
½ cup canned pumpkin puree
-
2 tbsp brown sugar
-
½ tsp pumpkin pie spice
-
¼ tsp vanilla extract
Mix ingredients together and use just under a tablespoon per hand pie. Avoid overfilling to prevent leaks.
Fun Variations & Decorating Tips
Looking to take these to the next level? Try one of these ideas:
-
Drizzle with icing: Mix powdered sugar and milk for a sweet glaze.
-
Color the dough: Add a touch of orange food coloring to your dough for extra pumpkin vibes.
-
Savory version: Use cheese and roasted veggies or ham for a savory Halloween snack.
-
Personalize the faces: Let each guest or family member design their own jack-o’-lantern before baking.
Make-Ahead & Storage Tips
One of the best things about hand pies is that they store and reheat well.
-
Make-Ahead: Assemble pies and freeze unbaked. When ready to bake, add 5 extra minutes to baking time.
-
Storage: Store baked pies in an airtight container at room temperature for up to 2 days or in the fridge for 4 days.
-
Reheat: Warm in the oven at 300°F for 5–8 minutes to restore crispiness.
Serving Ideas
-
Halloween breakfast: Serve with warm cider or a pumpkin spice latte.
-
Party platter: Arrange hand pies on a board with other Halloween-themed treats.
-
Trick-or-treat send-off: Wrap in parchment and tuck into a Halloween treat bag as a homemade surprise.
FAQs
Do I need a pumpkin cookie cutter?
Not necessarily! You can use a round biscuit cutter and then shape the top slightly to resemble a pumpkin. Add a small “stem” piece with excess dough.
Can I use puff pastry instead of pie crust?
Yes! Puff pastry will make them extra flaky. Just reduce the baking time slightly (15–20 minutes).
Can I freeze them?
Absolutely. Freeze either before baking (best for fresh results) or after baking (great for quick reheats).
What if I don’t want to carve faces?
No problem! Just make them as regular hand pies in pumpkin shapes and decorate the tops with sugar, icing, or candy eyes.